
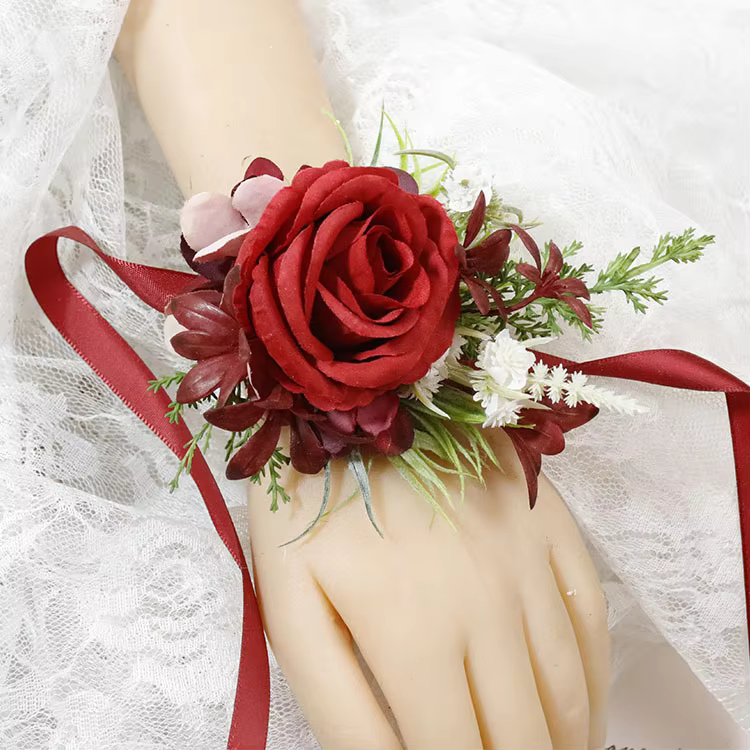
Picture this: You’re getting ready for that special occasion – whether it’s prom night, your daughter’s wedding, or an elegant anniversary dinner – and you want something truly unique that captures everyone’s attention. While fresh flower corsages wilt within hours, a beautifully crafted red silk rose corsage becomes a treasured keepsake that lasts forever.
Creating your own elegant red silk rose corsage isn’t just about saving money (though you’ll save 60-70% compared to florist prices!). It’s about crafting something personal, meaningful, and absolutely stunning that reflects your style and creativity. Moreover, with over 2.5 million proms happening annually in the United States alone, the demand for unique, lasting corsages has never been higher.
Ready to discover the secrets that professional florists use to create breathtaking corsages? Let’s dive into this step-by-step tutorial that’ll have you creating magazine-worthy corsages in under 30 minutes!
Why Choose Red Silk Roses for Your Special Occasion?
Red silk roses represent timeless elegance and passionate romance. Unlike fresh flowers that begin wilting the moment they’re cut, high-quality silk roses maintain their beauty indefinitely. Furthermore, silk roses are incredibly versatile – they won’t trigger allergies, won’t stain clothing, and can be customized to match any color scheme perfectly.
According to recent wedding industry statistics, 73% of brides now incorporate silk flowers into their special day arrangements, with red being the second most popular color choice after white. This trend extends beyond weddings to proms, anniversaries, and formal events where lasting beauty matters most.
Essential Materials You’ll Need (Complete Shopping List)
Before we begin crafting your masterpiece, gather these professional-grade materials:
Primary Flowers:
- 1 premium red silk rose (3-4 inches diameter)
- 2-3 small red silk rosebuds
- 4-6 pieces of silk baby’s breath or white filler flowers
- 3-4 silk rose leaves or eucalyptus sprigs
Professional Supplies:
- Green floral wire (22-24 gauge)
- Green floral tape
- Corsage pins (pearl-headed work best)
- Satin ribbon (⅜ inch wide)
- Small floral foam piece
- Elastic wrist band (for wrist corsages)
Tools:
- Wire cutters
- Needle-nose pliers
- Sharp scissors
The 7-Step Professional Corsage Creation Process
Step 1: Master the Foundation Technique
Start by preparing your main red silk rose. Carefully remove it from its original stem, leaving approximately one inch of stem attached. Next, insert a 6-inch piece of floral wire through the base of the rose head, then twist the wire ends together beneath the flower to create a secure foundation.
Pro Tip: Always use 22-gauge wire for larger flowers and 24-gauge for smaller accents – this prevents the corsage from becoming too heavy while maintaining structural integrity.
Step 2: Wire Your Accent Flowers Like a Pro
Transform your smaller rosebuds and baby’s breath into professional-grade components. Cut each rosebud stem to ½ inch, then carefully insert wire through the base and twist to secure. Subsequently, wrap each wired stem with green floral tape, starting from the flower base and working downward.
This technique, used by professional florists worldwide, ensures your corsage maintains its shape throughout the entire event.
Step 3: Create Natural-Looking Foliage
Prepare your silk leaves by wiring each piece individually. Insert wire through the leaf base or wrap it around the stem, then cover all visible wire with floral tape. Arrange leaves to create a natural, cascading effect that frames your roses beautifully.
Step 4: Build Your Comfort Base
Take a small piece of floral foam and wrap it with green floral tape to create a comfortable foundation pad. This professional technique prevents the corsage from feeling scratchy against delicate fabrics while providing a stable base for all your flowers.
Step 5: Assemble with Artistic Flair
Position your main rose as the stunning focal point, then arrange smaller rosebuds around it at varying heights to create visual interest. Fill in gaps with baby’s breath and accent flowers, adding foliage around the edges for that natural, professional finish.
Step 6: Secure Your Masterpiece
Twist all wired stems together to form one main stem, then wrap the entire stem area with floral tape for a clean, finished appearance. Trim the stem to your desired length – typically 2-3 inches works perfectly for most corsage styles.
Step 7: Add Those Finishing Touches
Create an elegant bow with your satin ribbon and attach it to the stem base. Insert 2-3 corsage pins through the back of your arrangement for easy attachment. For wrist corsages, secure an elastic band or ribbon ties.
Frequently Asked Questions About Red Silk Rose Corsages
Professional Styling Tips That Make the Difference
Creating a corsage that looks professionally made requires attention to detail. First, ensure all wire ends are completely covered and smooth to prevent snagging delicate fabrics. Second, keep your corsage lightweight – heavy arrangements tend to sag and feel uncomfortable throughout long events.
Additionally, consider the dress style when planning your corsage. Strapless gowns pair beautifully with wrist corsages, while one-shoulder dresses showcase shoulder corsages perfectly. Classic evening wear calls for traditional shoulder placement, and vintage-style dresses look stunning with smaller, more delicate designs.
Cost-Saving Benefits That’ll Surprise You
Creating your own red silk rose corsage saves significant money compared to professional florist prices. While a professionally made corsage typically costs $25-45, your DIY version costs approximately $8-12 in materials. Moreover, you can create multiple corsages for wedding parties or family events at a fraction of professional prices.
Furthermore, silk corsages eliminate the stress of last-minute flower ordering and potential disappointment with color matching or quality issues.
Troubleshooting Common Corsage Problems
If your corsage feels too heavy, reduce the number of accent flowers or switch to lighter-weight silk varieties. When flowers won’t stay in position, ensure you’re using the correct wire gauge and wrapping techniques. Additionally, if your corsage looks too flat, vary the heights of your flowers and add more dimensional foliage.
Creating an elegant red silk rose corsage transforms from intimidating task to enjoyable creative project when you follow these professional techniques. Not only will you save money and create something uniquely yours, but you’ll also have a beautiful keepsake that captures the magic of your special occasion forever.
Remember, the key to corsage success lies in quality materials, proper technique, and attention to detail. With these 7 proven steps, you’re equipped to create stunning corsages that rival any professional florist’s work.
So why settle for ordinary when you can create extraordinary? Your perfect red silk rose corsage is just 30 minutes away – and the compliments you’ll receive will make every minute of effort worthwhile!